- Updated on Nov 20, 2015 to migrate to Alamofire v3.x and Swinject v0.5.
In the last blog post, we developed the model part of the simple weather app, and learnt how to remove tightly coupled dependencies by using dependency injection and Swinject. We found the decoupling made unit testing easier. In this blog post, we are going to develop the UI part of the app, and will learn how to wire up the decoupled components with Swinject.
The source code used in this blog post is available at a repository on GitHub.
Basic UI Structure
First, we are going to make a basic UI structure to show the weather information in a table view. Remove ViewController.swift and add WeatherTableViewController.swift, which has an empty definition of WeatherTableViewController. We will implement the class later with the dependency injection pattern.
WeatherTableViewController.swift
import UIKit

class WeatherTableViewController: UITableViewController {
}
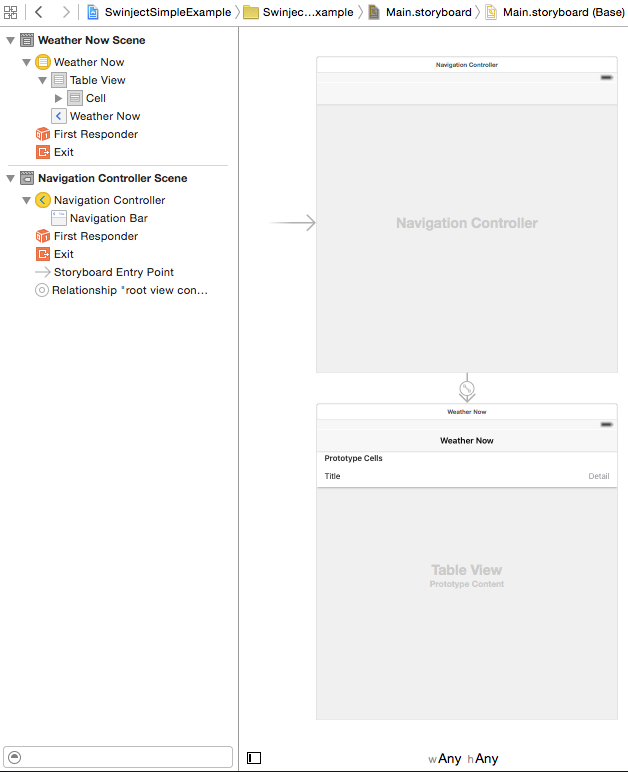
Open Main.storyboard and remove the existing view controller. Then add a new navigation controller to the storyboard from the object library pane.
Select the navigation controller and check "Is Initial View Controller" in the attribute inspector.
Select the table view controller, which is the root view controller of the navigation controller, and set its custom class to WeatherTableViewController. Select the prototype cell on the table view, and set its style to Right Detail and identifier to "Cell". Select the navigation item on the table view controller, and set its title to "Weather Now".

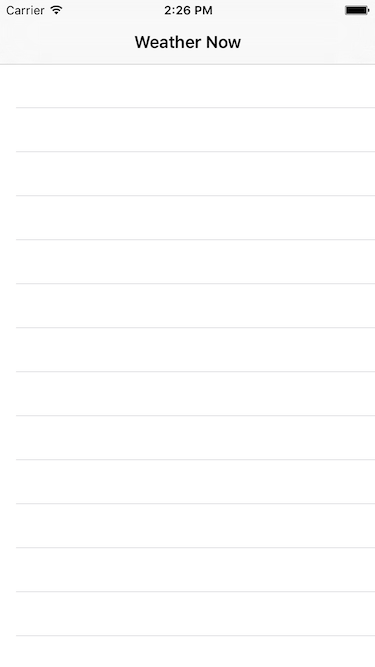
Ok, we are ready to run the app. Type Command-R to run. You will see an empty table view like the following image.

Dependency Injection to View Controller
Let’s implement the empty table view controller and add dependency injection to it.
Add weatherFetcher property to WeatherTableViewController.
WeatherTableViewController.swift
class WeatherTableViewController: UITableViewController {
    var weatherFetcher: WeatherFetcher?
}
Add a file named SwinjectStoryboard+Setup.swift with the following implementation of an extension.
SwinjectStoryboard+Setup.swift
import Swinject

extension SwinjectStoryboard {
    class func setup() {
        defaultContainer.registerForStoryboard(WeatherTableViewController.self) { r, c in
            c.weatherFetcher = r.resolve(WeatherFetcher.self)
        }
        defaultContainer.register(Networking.self) { _ in Network() }
        defaultContainer.register(WeatherFetcher.self) { r in
            WeatherFetcher(networking: r.resolve(Networking.self)!)
        }
    }
}
The setup method in the extension is called only once before the first instance of SwinjectStoryboard is instantiated. The method is used to setup defaultContainer static property, which is used by an instance of SwinjectStoryboard if no container is passed to the initializer of SwinjectStoryboard or the instance is created by the runtime. We define the dependencies in the extension because we want to instantiate SwinjectStoryboard from Main.storyboard by the runtime when our app is launched. SwinjectStoryboard is automatically instantiated when the runtime tries to instantiate UIStoryboard.
In the setup method, first, registerForStoryboard is used to configure dependency injection to WeatherTableViewController. Here weatherFetcher property is configured to be set to an instance of WeatherFetcher when the view controller is instantiated. This style of dependency injection to a property is called “property injection”. Second, Networking protocol, which was defined in the last blog post, is configured to be Network encapsulating Alamofire. Third, WeatherFetcher is configured to be initialized with a resolved Networking instance. This style of dependency injection to an initializer argument is called “initializer injection”.
Ok, we finished configuring the dependency injection. Let’s move on to the implementation of WeatherTableViewController.
WeatherTableViewController.swift
class WeatherTableViewController: UITableViewController {
    var weatherFetcher: WeatherFetcher?

    private var cities = [City]() {
        didSet {
            tableView.reloadData()
        }
    }

    override func viewWillAppear(animated: Bool) {
        super.viewWillAppear(animated)

        weatherFetcher?.fetch {
            if let cities = $0 {
                self.cities = cities
            }
            else {
                // Show an error message.
            }
        }
    }

    // MARK: UITableViewDataSource
    override func tableView(
        tableView: UITableView,
        numberOfRowsInSection section: Int) -> Int
    {
        return cities.count
    }

    override func tableView(
        tableView: UITableView,
        cellForRowAtIndexPath indexPath: NSIndexPath) -> UITableViewCell
    {
        let cell = tableView.dequeueReusableCellWithIdentifier(
            "Cell", forIndexPath: indexPath)
        let city = cities[indexPath.row]
        cell.textLabel?.text = city.name
        cell.detailTextLabel?.text = city.weather
        return cell
    }
}
First, cities property is added with an initial empty array of City. Setting the property triggers refreshing the table view.
Second, viewWillAppear is overridden to start fetching weather information by fetch method1. It takes a closure, and invokes the closure with an array of City when the weather data are retrieved. In the closure, self.cities is set and the table view is refreshed consequently. If fetch fails, it passes nil to the closure. In this blog post, the error handling is omitted, but the source code in the GitHub repository has an implementation to show an error message.
At last, tableView:numberOfRowsInSection: and tableView:cellForRowAtIndexPath: are implemented to tell the number of rows and to set city name and weather labels of a cell.
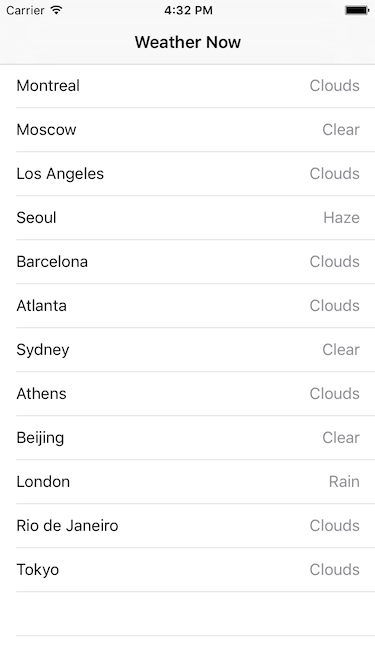
We have finished implementing the UI. Let’s run the app. You will see the table view filled with current weather information.

Testing View Controller
We have already seen the app works, but let me add a unit test for WeatherTableViewController. We are going to check the view controller starts fetching weather data when the view appears. In this test, we will see the concept of mocking.
Add WeatherTableViewControllerSpec.swift to SwinjectSimpleExampleTests with the following content.
WeatherTableViewControllerSpec.swift
import Quick
import Nimble
import Swinject
@testable import SwinjectSimpleExample

class WeatherTableViewControllerSpec: QuickSpec {
    class MockNetwork: Networking {
        var requestCount = 0

        func request(response: NSData? -> ()) {
            requestCount++
        }
    }

    override func spec() {
        var container: Container!
        beforeEach {
            container = Container()
            container.register(Networking.self) { _ in MockNetwork() }
                .inObjectScope(.Container)
            container.register(WeatherFetcher.self) { r in
                WeatherFetcher(networking: r.resolve(Networking.self)!)
            }
            container.register(WeatherTableViewController.self) { r in
                let controller = WeatherTableViewController()
                controller.weatherFetcher = r.resolve(WeatherFetcher.self)
                return controller
            }
        }

        it("starts fetching weather information when the view is about appearing.") {
            let network = container.resolve(Networking.self) as! MockNetwork
            let controller = container.resolve(WeatherTableViewController.self)!

            expect(network.requestCount) == 0
            controller.viewWillAppear(true)
            expect(network.requestCount).toEventually(equal(1))
        }
    }
}
At the beginning, a mock of Networking is defined as MockNetwork. It has request method, but never returns a response. Instead, it increments a counter named requestCount. A mock is used to check whether methods or properties of an instance are called as intended. Although it may return dummy data like a stub does, the ability to check method or property calls differentiates a mock from a stub.
In spec, we skip to it for now. First, instances of MockNetwork and WeatherTableViewController are retrieved from the configured container. Because we know Networking is resolved to MockNetwork, we cast the returned instance to MockNetwork. Then, it is checked, by the requestCount counter, that request method of the mock is called once after viewWillAppear of the view controller is called. Although WeatherTableViewController does not directly own Networking instance, we can ensure related instances are connected correctly by checking the call of the mocked method.
Let’s go back to the configuration of the container. First, Networking is registered to be resolved to MockNetwork, and its instance is configured to be shared within the container. By setting the object scope, it is ensured that the instance of MockNetwork to check the counter is identical to the instance indirectly owned by WeatherTableViewController. Second, initializer injection of WeatherFetcher dependency is registered. Third, property injection of WeatherTableViewController dependency is registered.
Let’s run the unit test. Passed, right? Assume you keep developing the weather app to add more features. The unit test gives you confidence that you will never break the connection of the UI and model.
Conclusion
We have developed the UI part of the simple weather app, and learnt how to wire the components with a dependency injection container. SwinjectStoryboard makes it easy to inject dependencies to view controllers defined in a storyboard. We have learnt, at last, a mock can be used to ensure that the components are wired as intended by checking a method call to the instance located at the terminal of the chain of dependencies.
In the next blog post, we will develop a larger example app in MVVM architecture with the popular and elegant Swift reactive programming framework, ReactiveCococa. Of course, we will take advantage of dependency injection with Swinject to wire up the loosely coupled MVVM components.
- In the example app,
fetchis called only inviewWillAppear, but a product app should have a button or something else to refresh the weather information. [return]