- Updated on Jan 7, 2016 to remove notice about pre-release version of ReactiveCocoa v4.0.0.
- Updated on Dec 29, 2015 to install ReactiveCocoa v4.0.0-RC.1 and Swinject v1.0.0.
- Updated on Dec 23, 2015 for the update of Pixabay API dropping
usernamefield. - Updated on Dec 2, 2015 for the update of ReactiveCocoa to v4.0.0 alpha 4 in Cartfile.
- Updated on Nov 20, 2015 to migrate to ReactiveCocoa v4.0.0 alpha 3, Alamofire v3.x and Himotoki v1.3.
- Updated on Oct 1, 2015 for the release versions of Swift 2 and Xcode 7.
In the last blog post, the basic concepts of MVVM (Model-View-ViewModel) and ReactiveCocoa were introduced. From this blog post, we are going to develop an example app to demonstrate dependency injection with Swinject in MVVM architecture. We will use ReactiveCococa to handle events passed between MVVM components. In this blog post, you will learn how to setup an Xcode project composing Molel, View and ViewModel as frameworks.
The example app asynchronously searches, downloads and displays images obtained from Pixabay via its API, as shown in the GIF animation below. The source code used in the blog posts is available at:
- SwinjectMVVMExample: Complete version of the project.
- SwinjectMVVMExample_ForBlog: Simplified version of the project to follow the blog posts (except updates of Xcode and frameworks).

Requirements
Carthage can be installed by its installer (Carthage.pkg). If you are new to Carthage, check this tutorial page.
You can get a free API key at Pixabay. First, sign up and log in there. Then, access its API documentation page. Your API key will be displayed in “Request parameters” section.
Project Setup Overview
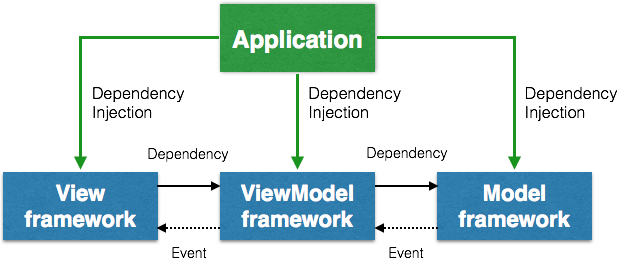
In the last blog post, we learned View depended on ViewModel and ViewModel on Model in MVVM architecture. How can we force the direction of dependencies when we write protocols, classes or structs representing Models, Views or ViewModels? It is easy to get chaotic if all the types are placed in a directory, or even in an application target.
Java or .NET applications are often composed of several JARs or DLLs to make the responsibilities of the components explicit. Since iOS 8 has introduced dynamic frameworks, it is easy to setup an iOS app composed of several dynamic frameworks. The architecture of an iOS app containing Model, View and ViewModel frameworks, as diagrammed in the image below, ensures that the direction of the dependencies is from View to ViewModel and ViewModel to Model with the dependencies injected by the application. For example, if you make a type in ViewModel framework, it can reference types in Model framework but cannot those in View framework.
The architecture keeps the consistency of the direction of the dependencies, and makes the app easy to develop, test and maintain.
Project Setup Composing MVVM Frameworks
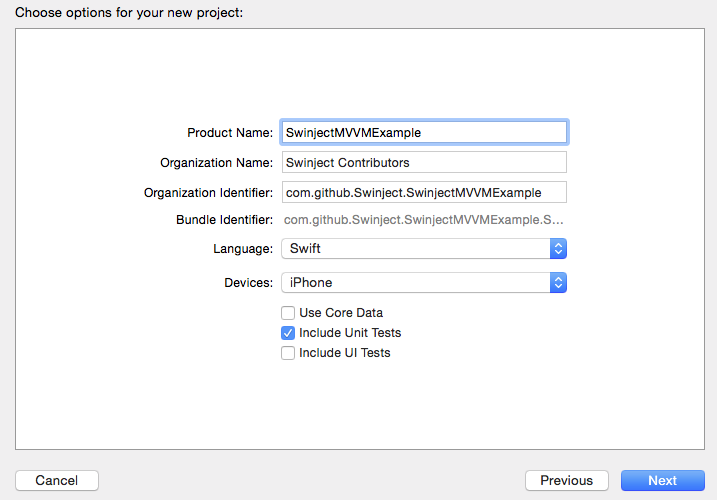
Let’s start creating our Xcode project composing the MVVM frameworks. Select File > New > Project... menu and iOS > Application > Single View Application item. Set its product name to SwinjectMVVMExample, add .SwinjectMVVMExample to the end of the bundle identifier, set language to Swift and devices to iPhone, and check Include Unit Tests only1. Save it anywhere in your local storage.
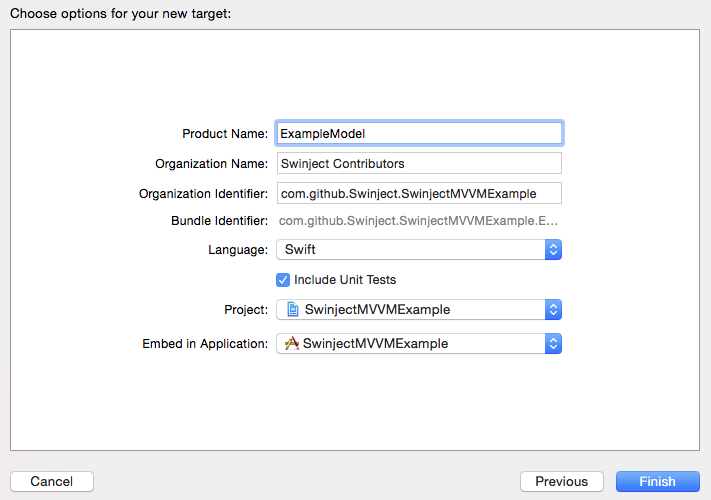
Next we are going to add Model, View and ViewModel frameworks. They will be named ExampleModel, ExampleView and ExampleViewModel, respectively, in our example app. When you create your own app, it is recommended to name the frameworks as YourAppName + Model, View, and ViewModel. For exampe, if your app name is Foobook, your framework names may be FoobookModel, FoobookView and FoobookViewModel.
Select File > New > Target... menu and iOS > Framework & Library > Cocoa Touch Framework. Click Next button. In the next page, set product name to ExampleModel, language to Swift. Keep Include Unit Test checked and click Finish. In the same way, add ExampleViewModel and ExampleView framework targets.
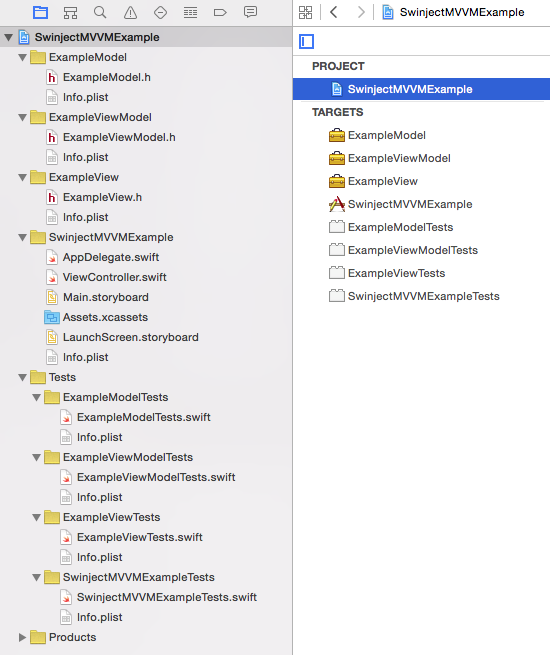
Right click on SwinjectMVVMExample in Project Navigator (the left pane in Xcode), and select New Group. Set the group name to Tests. Drag ExampleModel, ExampleViewModel, ExampleView, ExampleModelTests, ExampleViewModelTests, ExampleViewTests and SwinjectMVVMExampleTests in Project Navigator, and place them as shown in the image below. Select SwinjectMVVMExample in Project Navigator, and order the targets by dragging as shown in the image.
We are going to configure dependency and link settings of the targets. Select SwinjectMVVMExample in Project Navigator, and select ExampleViewModel in Targets area. In Build Phases tab, click + button in Target Dependencies section, and add ExampleModel. Click + button in Link Binary with Libraries section, and add ExampleModel.framework. In the same way, add ExampleViewModel and ExampleViewModel.framework to those of ExampleView target. Target settings of ExampleModel and SwinjectMVVMExample can be left because ExampleModel has no dependencies and SwinjectMVVMExample has those settings by default.
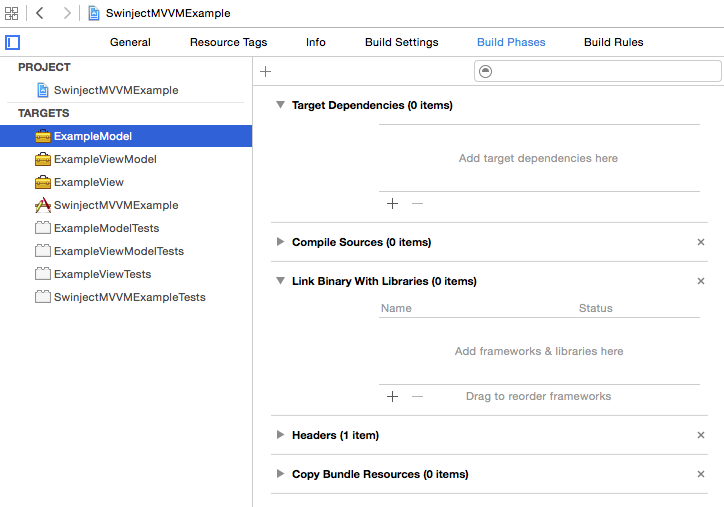
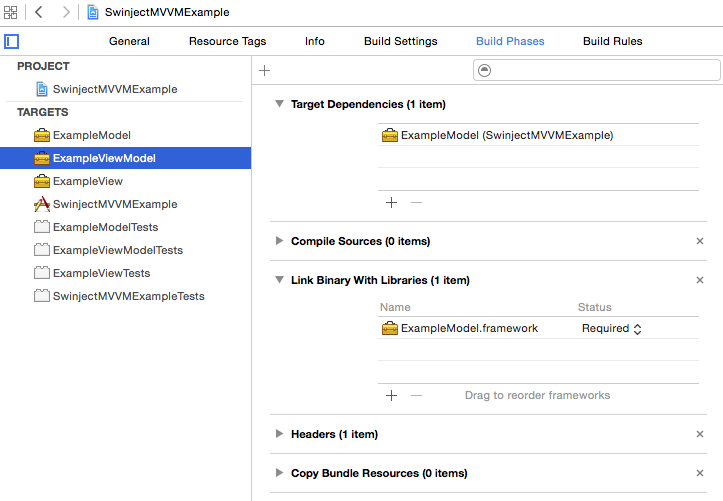
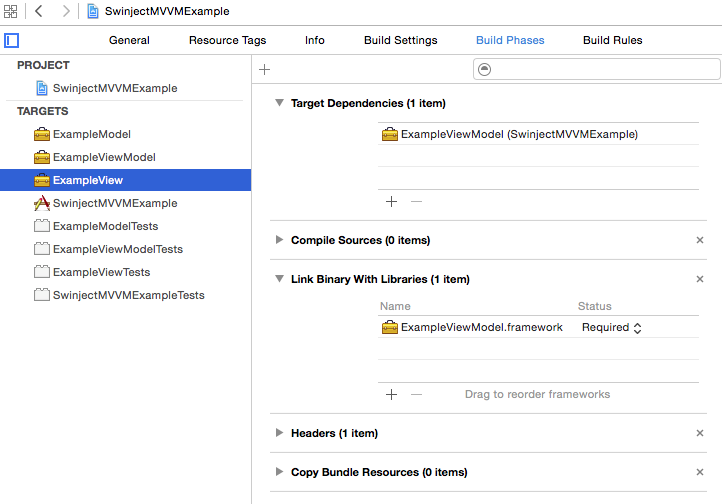
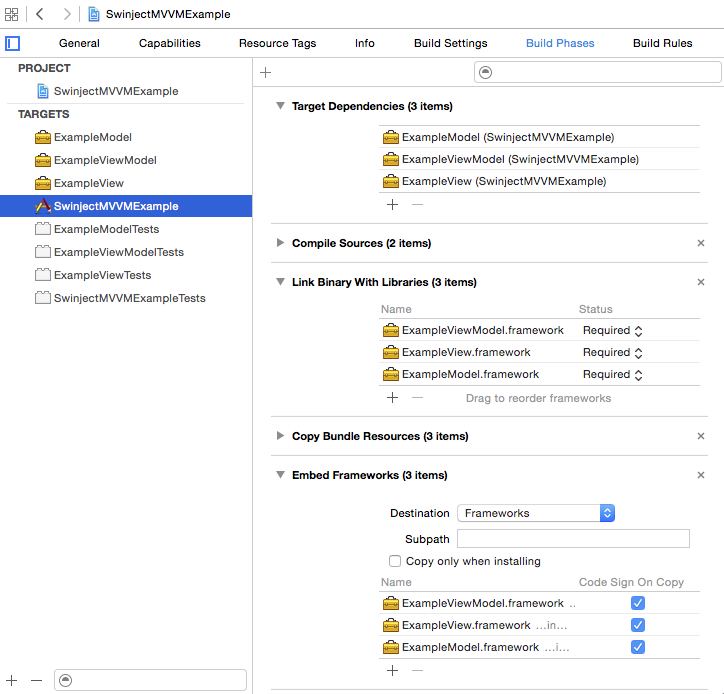
We are going to configure unit test targets too. Select SwinjectMVVMExample in Project Navigator, and select ExampleModelTests in Targets area. In General tab, set Host Application to None. In the same way, set Host Application of ExampleViewModelTests and ExampleViewTests to None.
Again select ExampleModelTests in Targets area. In Build Phases tab, remove SwinjectMVVMExample in Target Dependencies section by selecting it and click - button. In the same remove target dependency on SwinjectMVVMExample from ExampleViewModelTests and ExampleViewTests.
Select ExampleViewModelTests in Targets area. In Build Phases tab, add ExampleModel.framework to Link Binary with Libraries section. In the same way, add ExampleViewModel.framework to that of ExampleViewTests. We need those links to stub or mock types in the linked frameworks.
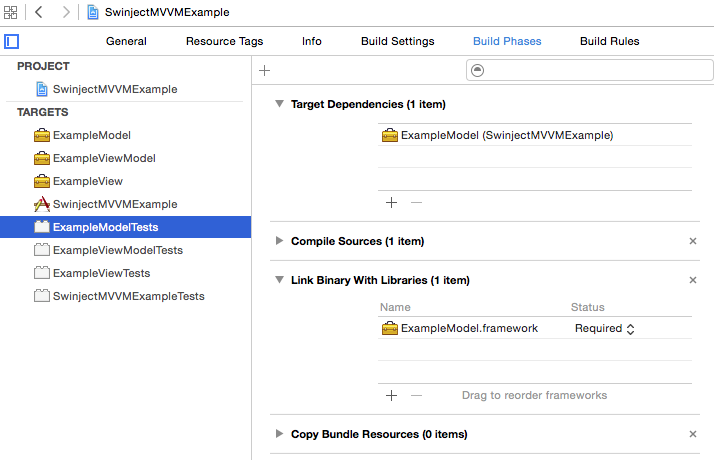
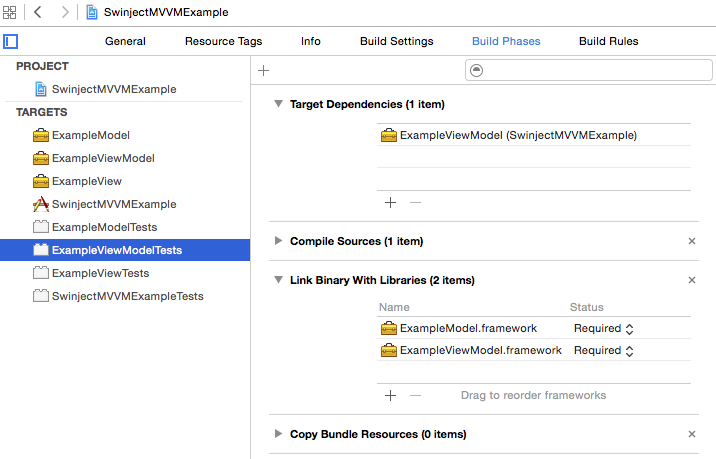
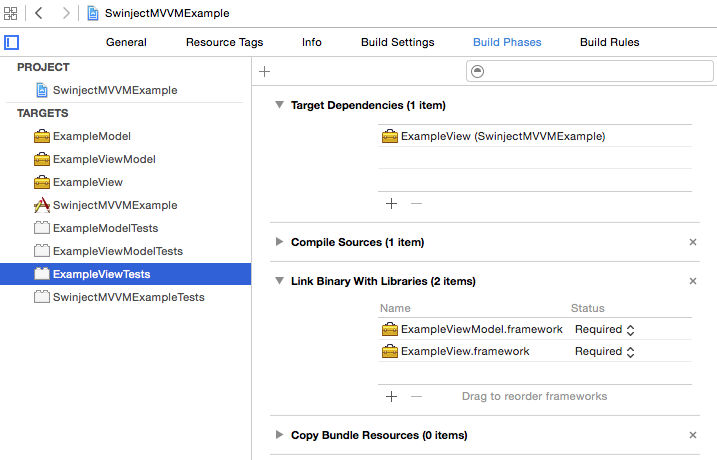
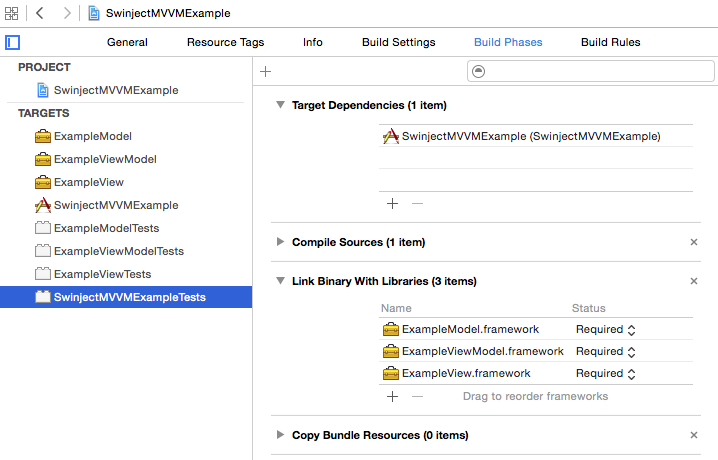
We are going to setup a build scheme. Click scheme button on the Xcode toolbar, and select Manage Schemes... If you see ExampleModel, ExampleViewModel and ExampleView schemes, select them and click - button to delete them. Then select SwinjectMVVMExample scheme and click Edit button. Make sure that ExampleModelTests, ExampleViewModelTests, ExampleViewTests and SwinjectMVVMExampleTests are checked in Build and Test settings.
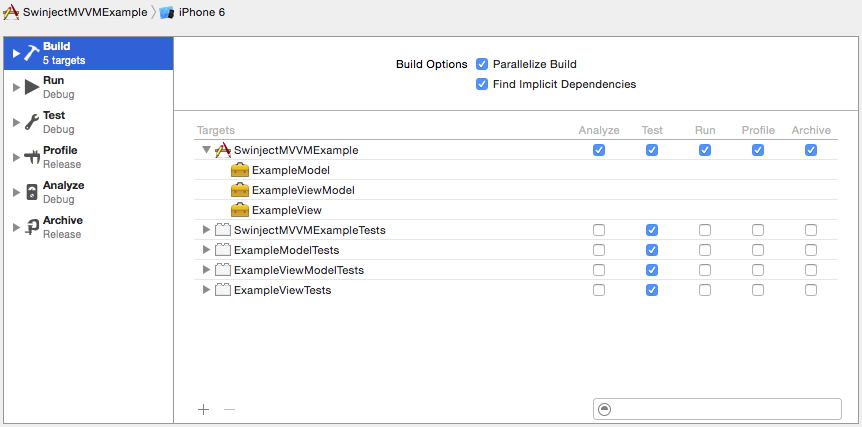
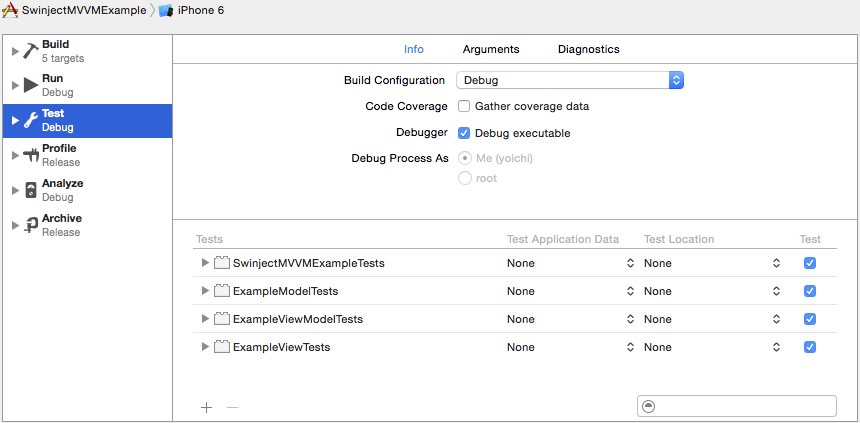
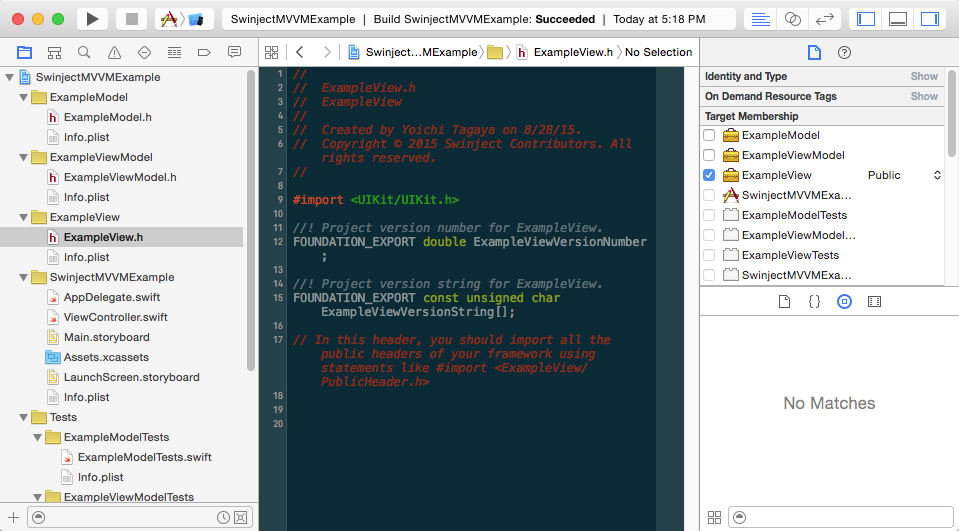
Okay, we have finished setting up the project. Run the app (Command-R), then unit tests (Command-U) to check whether the project is configured correctly. If you see an error for an umbrella header, set the target membership of the header file to the target with Public accessibility as shown in the image below. Xcode sometimes creates umbrella headers with wrong target memberships.
Installation of External Frameworks with Carthage
We are going to install ReactiveCocoa, Himotoki, Alamofire, Swinject, Quick and Nimble. We used Alamofire, Quick and Nimble in the previous example project. This time, we are going to use Himotoki, which is a type-safe JSON decoding library, in place of SwiftyJSON. The details of Himotoki will be mentioned in the next blog post when we use it.
To install them with Carthage, add a text file named Cartfile with the following contents.
Cartfile
github "ReactiveCocoa/ReactiveCocoa" "v4.0.0-RC.1"
github "ikesyo/Himotoki" ~> 1.3.0
github "Alamofire/Alamofire" ~> 3.1.2
github "Swinject/Swinject" ~> 1.0.0

github "Quick/Quick" == 0.8.0
github "Quick/Nimble" == 3.0.0
Run carthage update --no-use-binaries --platform iOS in Terminal2. Wait for a couple of minutes (or more) until Carthage finishes building the frameworks3. If you use Git, here is a .gitignore for Swift excluding frameworks built by Carthage.
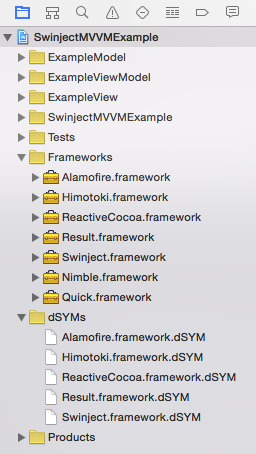
After the build completes, right click on SwinjectMVVMExample in Project Navigator, and select New Group. Name the group Frameworks. Drag and drop the frameworks built in Carthage/Build/iOS directory in Finder to the group in Xcode. When you drop them, an action sheet asks you wether they should be added to targets. Uncheck all targets and click Finish button.
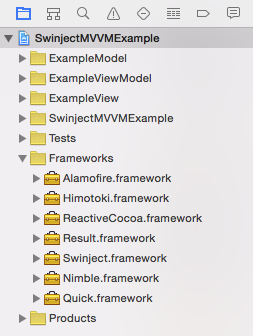
Select SwinjectMVVMExample in Project Navigator, and select ExampleModel in Target section with Build Phases tab open. Drag Alamofire.framework, Himotoki.framework, ReactiveCocoa.framework and Result.framework4 in the Frameworks group to Link Binary with Libraries section in Build Phases tab. In the same way, add ReactiveCocoa.framework and Result.framework to those of ExampleViewModel and ExampleView. Add Swinject.framework to that of SwinjectMVVMExample. Add ReactiveCocoa.framework, Result.framework, Quick.framework and Nimble.framework to those of ExampleModelTests, ExampleViewModelTests and ExampleViewTests. Add Swinject.framework, Quick.framework and Nimble.framework to that of SwinjectMVVMExampleTests. Alamofire and Himotoki are used only in our Model, Swinject only in our application and its test, and Quick and Nimble only in unit tests.
Select ExampleModelTests in Target section, click + button under Build Phases tab, select New Copy Files Phase, and name the new phase Copy Frameworks. Within the phase, set Destination to Frameworks. Drag Alamofire.framework, Himotoki.framework, ReactiveCocoa.framework, Result.framework, Quick.framework and Nimble.framework in Frameworks group on Project Navigator to Copy Frameworks phase. In the same way, add Copy Frameworks phases to ExampleViewModelTests and ExampleViewTests, and drag the 6 frameworks to the phases. Add Copy Frameworks phase to SwinjectMVVMExampleTests in the same way, and add Quick.framework and Nimble.framework to the phase. Because SwinjectMVVMExampleTests is hosted in the app, only Quick and Nimble, which are not used in the app, are added to the phase.
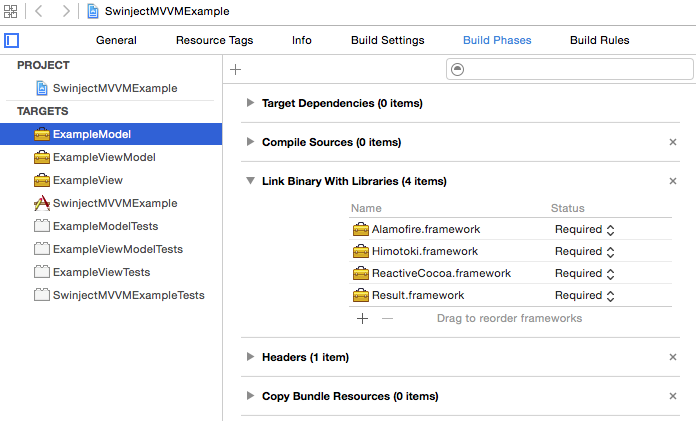
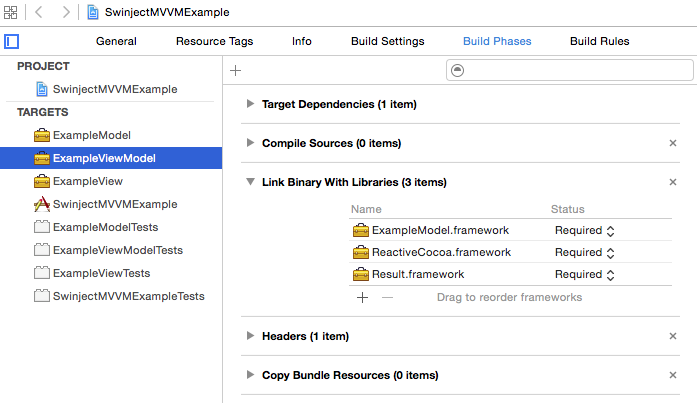
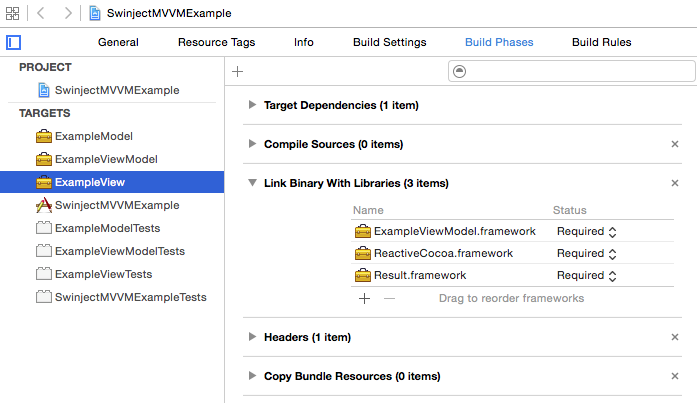
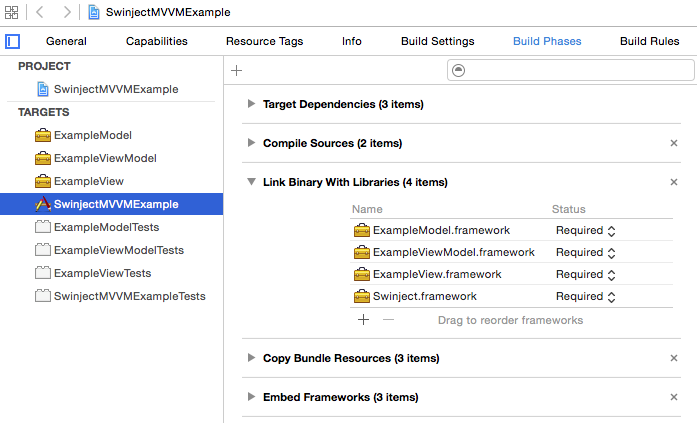
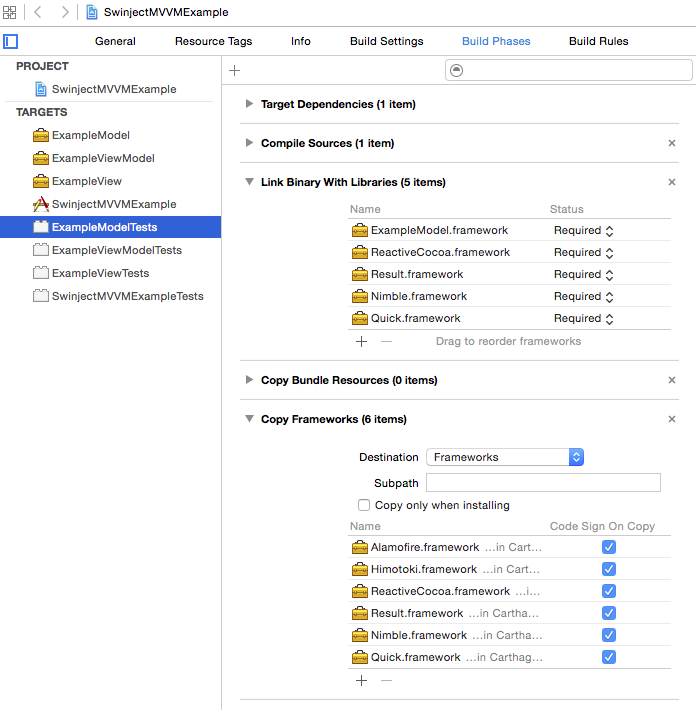
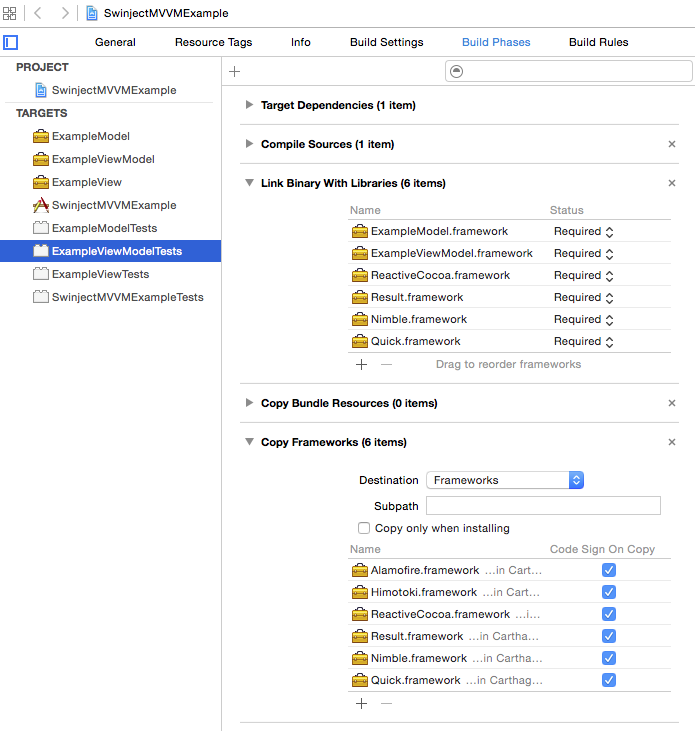
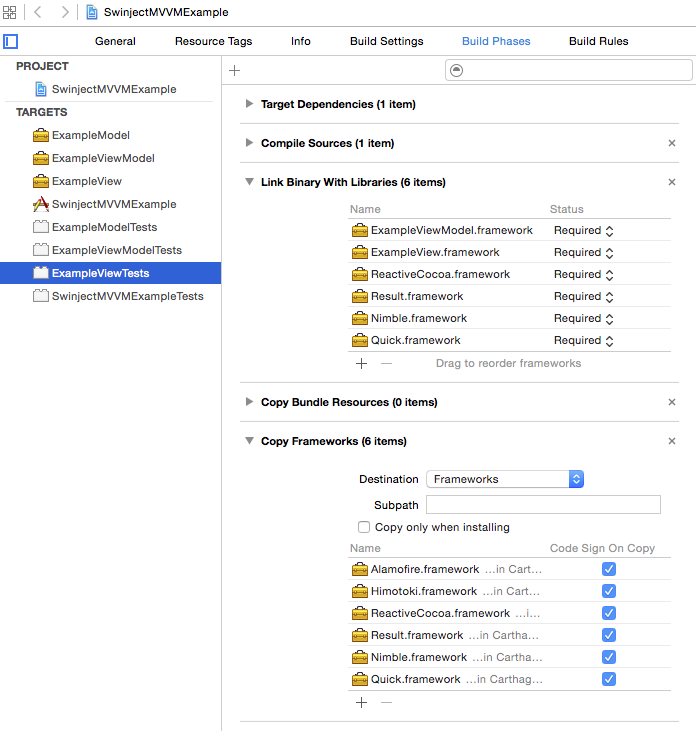
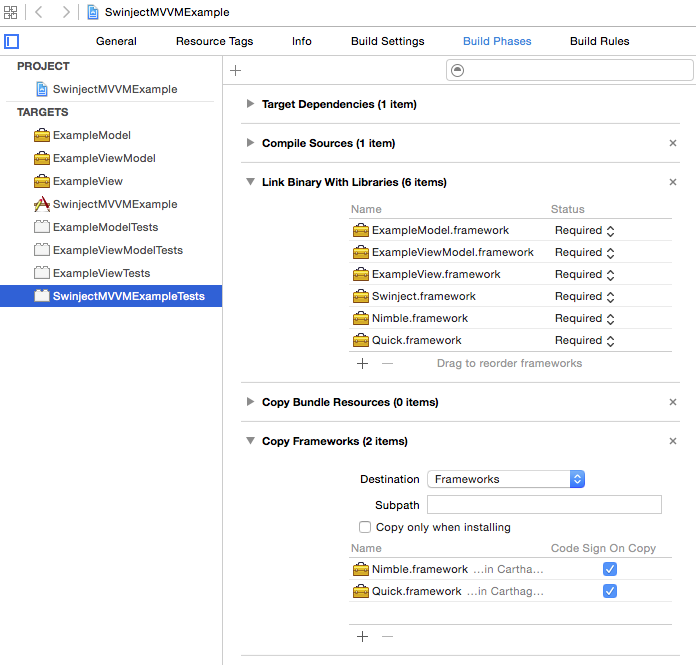
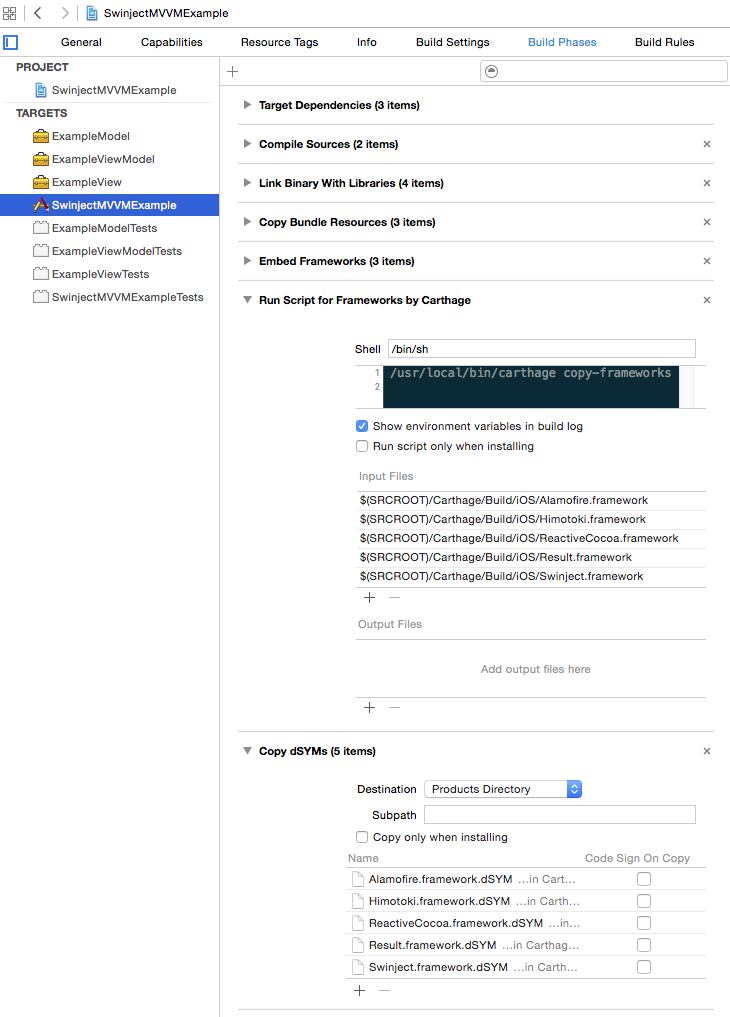
The last settings are as specified in the README of Carthage. Select SwinjectMVVMExample in Project Navigator, and select SwinjectMVVMExample in Targets section with Build Phases tab open. Click + button under the tab, and select New Run Script Phase. Rename the phase to Run Script for Frameworks by Carthage and add the following line to the script text field.
/usr/local/bin/carthage copy-frameworks
Then add the following paths to Input Files section by clicking + button.
$(SRCROOT)/Carthage/Build/iOS/Alamofire.framework
$(SRCROOT)/Carthage/Build/iOS/Himotoki.framework
$(SRCROOT)/Carthage/Build/iOS/ReactiveCocoa.framework
$(SRCROOT)/Carthage/Build/iOS/Result.framework
$(SRCROOT)/Carthage/Build/iOS/Swinject.framework
Again click the + button under Build Phases tab, select New Copy Files Phase and name the phase Copy dSYMs. Set its destination to Products Directory, and drag Alamofire.framework.dSYM, Himotoki.framework.dSYM, ReactiveCocoa.framework.dSYM, Result.framework.dSYM and Swinject.framework.dSYM from Carthage/Build/iOS/ directory in Finder to the Copy dSYMs phase in Xcode. Right click on SwinjectMVVMExample in Project Navigator and select New Group. Name the new group dSYMs and put the dSYM files that were added to Project Navigator automatically into the group to tidy up.
Configurations! You got the project set up. Try running the app and unit tests by Command-R and Command-U to confirm the project is setup as intended. If you get an error, download the project on GitHub and compare your project with it to investigate what is wrong.
Conclusion
We found that the architecture of the app composed of Model, View and ViewModel frameworks ensured the direction of dependencies was consistent from View to ViewModel and ViewModel to Model. We setup the Xcode project in the MVVM architecture, and installed some external frameworks with Carthage. In the next blog post, we will start developing the app with ReactiveCocoa and Swinject to take advantage of the MVVM architecture.
If you have questions, suggestions or problems, feel free to leave comments.
- UI tests are excluded because they are out of scope of this blog post. [return]
--no-use-binariesoption is supplied tocarthage updatecommand to avoid downloading zipped frameworks built with an older version of Xcode. If your Xcode version matches those building the zipped frameworks, you can just runcarthage update. [return]- If you get an error on
carthage update --no-use-binariescommand, run it again with--verboseoption too to investigate the problem. [return] Result.frameworkis used by ReactiveCocoa. [return]