- Updated on Jan 7, 2016 to remove notice about pre-release version of ReactiveCocoa v4.0.0.
- Updated on Nov 20, 2015 to migrate to ReactiveCocoa v4.0.0 alpha 3 and Alamofire v3.x.
- Updated on Oct 1, 2015 for the release versions of Swift 2 and Xcode 7.
In the last blog post, we developed the Model part of the example app. In this blog post, we will move on to the View and ViewModel parts. First, empty implementation of View and ViewModel will be added to the project to get working software. Then actual implementation will be added with unit tests. During the development, we will learn how to use AnyProperty and MutableProperty types, which are observable properties provided by ReactiveCocoa.
The source code used in the blog posts is available at:
- SwinjectMVVMExample: Complete version of the project.
- SwinjectMVVMExample_ForBlog: Simplified version of the project to follow the blog posts (except updates of Xcode and frameworks).
View and ViewModel Design Overview
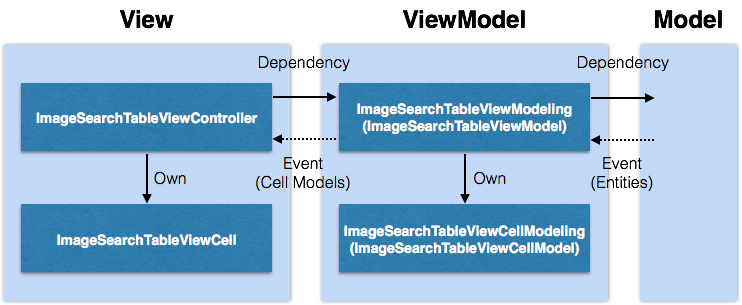
To decouple View and ViewModel, the interfaces are defined as protocols as shown in the diagram below. ImageSearchTableViewModeling and ImageSearchTableViewCellModeling are protocols. ImageSearchTableViewModel and ImageSearchTableViewCellModel are their implementation conforming the protocols. ImageSearchTableViewModel receives image entities wrapped in an event from the Model layer, and converts them to ImageSearchTableViewCellModel instances to pass to ImageSearchTableViewController in an event.
Empty Implementation of View and ViewModel
At the beginning, we are going to add empty implementation of View and ViewModel with dependency injection by Swinject. You can get still empty but working software first, then add features one by one as the Agile practices promote.
Adding Empty View
First, delete unnecessary files and a setting. Delete ViewController.swift and Main.storyboard in SwinjectMVVMExample group. Open Info.plist in SwinjectMVVMExample group, and delete Main storyboard file base name item (or UIMainStoryboardFile item if you are displaying raw keys/values).
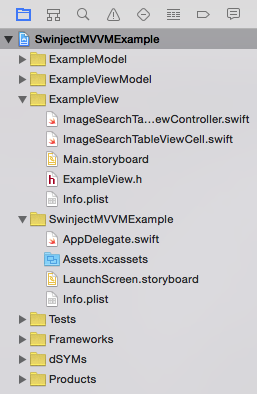
Then add ImageSearchTableViewController.swift with the following contents to ExampleView group. Make sure that the file is added to ExampleView target. To add it to the target, right click on ExampleView group, select New File..., navigate to iOS > Source > Swift File item, and check ExampleView target when you are asked to name the file.
ImageSearchTableViewController.swift
import UIKit

public final class ImageSearchTableViewController: UITableViewController {
}
In the same way, add ImageSearchTableViewCell.swift with the following content to ExampleView group.
ImageSearchTableViewCell.swift
import UIKit

internal final class ImageSearchTableViewCell: UITableViewCell {
}
Notice that ImageSearchTableViewController is public but ImageSearchTableViewCell is internal because the cell is handled by only the table view controller and it should not be visible to the user of ExampleView framework.
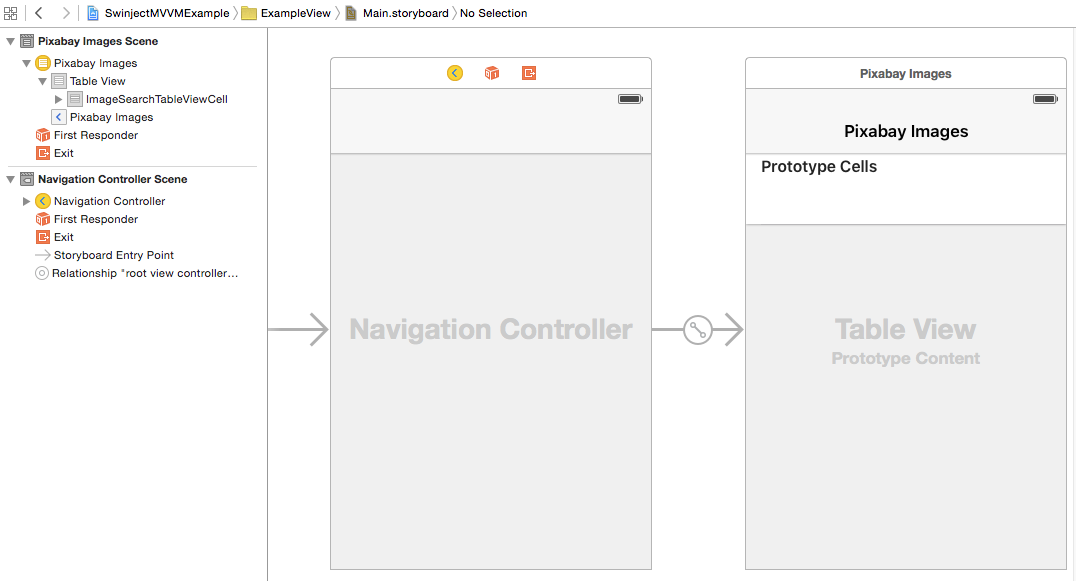
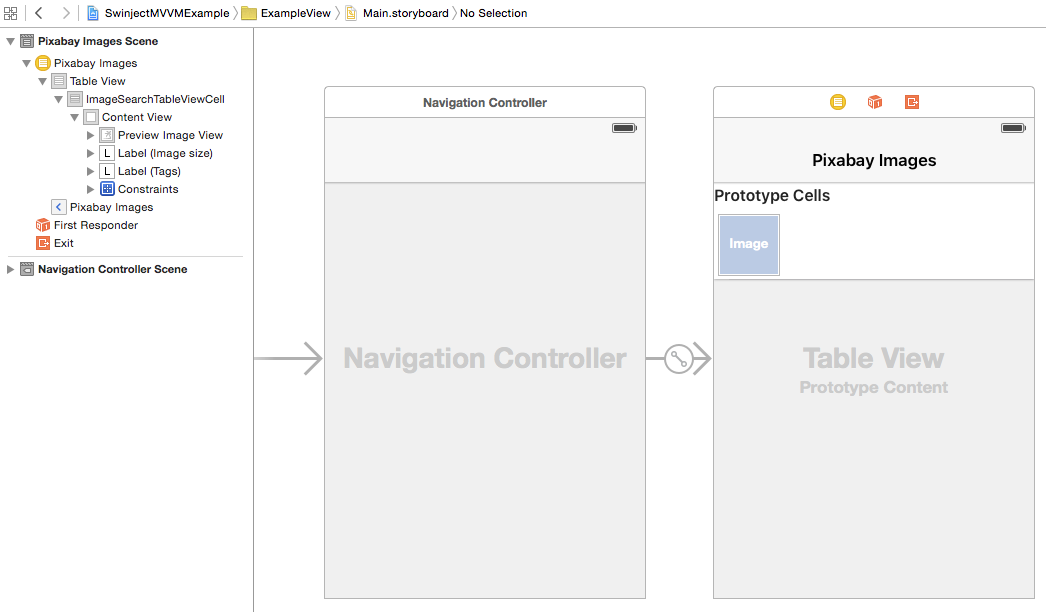
Add a new storyboard named Main.storyboard to ExampleView group. Open the storyboard, and add a navigation controller to the storyboard from Object Library. Select the navigation controller and check “Is Initial View Controller” in Attribute Inspector.
Select the table view controller, which is the root view controller of the navigation controller, and set its custom class and storyboard ID to ImageSearchTableViewController. Select the prototype cell on the table view controller, and set its custom class and cell identifier to ImageSearchTableViewCell. Select the navigation item on the table view controller, and set its title to “Pixabay Images”.
Modify AppDelegate.swift in SwinjectMVVMExample group to instantiate the initial view controller from the storyboard by hand. Here, we use SwinjectStoryboard instead of UIStoryboard to add dependency injection later. The instantiation of SwinjectStoryboard is not performed with an initializer but create function1. The bundle passed to SwinjectStoryboard is not the main bundle but the bundle in ExampleView target. NSBundle.init(forClass:) is used to get the bundle.
AppDelegate.swift
import UIKit
import Swinject
import ExampleView

@UIApplicationMain
class AppDelegate: UIResponder, UIApplicationDelegate {
    var window: UIWindow?

    func application(
        application: UIApplication
        didFinishLaunchingWithOptions launchOptions: [NSObject: AnyObject]?) -> Bool
    {
        let window = UIWindow(frame: UIScreen.mainScreen().bounds)
        window.backgroundColor = UIColor.whiteColor()
        window.makeKeyAndVisible()
        self.window = window

        let bundle = NSBundle(forClass: ImageSearchTableViewController.self)
        let storyboard = SwinjectStoryboard.create(name: "Main", bundle: bundle)
        window.rootViewController = storyboard.instantiateInitialViewController()

        return true
    }

    // Omitted...
}
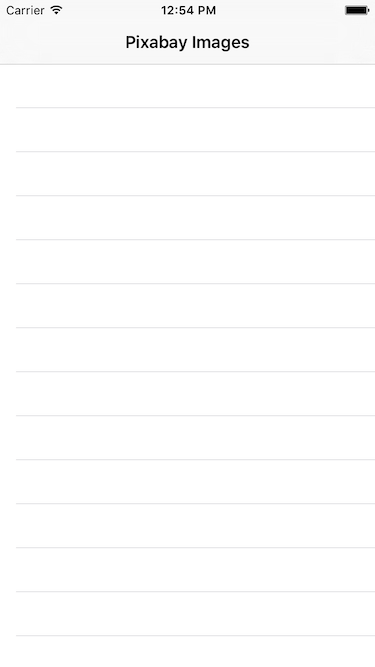
We are ready to run the app. Type Command-R to run. You will see an empty table view like the following image.
Adding Empty ViewModel
Add ImageSearchTableViewModeling.swift and ImageSearchTableViewModel.swift with the following contents to ExampleViewModel group. Make sure that they are added to ExampleViewModel target when you save them. The dependency of ImageSearchTableViewModel on ImageSearching is injected through its initializer as initializer injection pattern.
ImageSearchTableViewModeling.swift
public protocol ImageSearchTableViewModeling {
}
ImageSearchTableViewModel.swift
import ExampleModel

public final class ImageSearchTableViewModel: ImageSearchTableViewModeling {
    private let imageSearch: ImageSearching

    public init(imageSearch: ImageSearching) {
        self.imageSearch = imageSearch
    }
}
Add ImageSearchTableViewCellModeling.swift and ImageSearchTableViewCellModel.swift with the following contents to ExampleViewModel group.
ImageSearchTableViewCellModeling.swift
public protocol ImageSearchTableViewCellModeling {
}
ImageSearchTableViewCellModel.swift
public final class ImageSearchTableViewCellModel: ImageSearchTableViewCellModeling {
}
Add the dependencies on the view models to ImageSearchTableViewController and ImageSearchTableViewCell as below by property injection pattern.
ImageSearchTableViewController.swift
import UIKit
import ExampleViewModel

public final class ImageSearchTableViewController: UITableViewController {
    public var viewModel: ImageSearchTableViewModeling?
}
ImageSearchTableViewCell.swift
import UIKit
import ExampleViewModel

internal final class ImageSearchTableViewCell: UITableViewCell {
    internal var viewModel: ImageSearchTableViewCellModeling?
}
Applying Dependency Injection
To apply dependency injection in AppDelegate, add container property registering the dependencies as below. Here a convenience initializer of Container taking a closure to configure the instantiated container is used. The container is passed to the factory method of SwinjectStoryboard.
AppDelegate.swift
import UIKit
import Swinject
import ExampleModel
import ExampleViewModel
import ExampleView

@UIApplicationMain
class AppDelegate: UIResponder, UIApplicationDelegate {
    var window: UIWindow?
    let container = Container() { container in
        // Models
        container.register(Networking.self) { _ in Network() }
        container.register(ImageSearching.self) { r in
            ImageSearch(network: r.resolve(Networking.self)!)
        }

        // View models
        container.register(ImageSearchTableViewModeling.self) { r
            in ImageSearchTableViewModel(imageSearch: r.resolve(ImageSearching.self)!)
        }

        // Views
        container.registerForStoryboard(ImageSearchTableViewController.self) {
            r, c in
            c.viewModel = r.resolve(ImageSearchTableViewModeling.self)!
        }
    }

    func application(
        application: UIApplication,
        didFinishLaunchingWithOptions launchOptions: [NSObject: AnyObject]?) -> Bool
    {
        let window = UIWindow(frame: UIScreen.mainScreen().bounds)
        window.backgroundColor = UIColor.whiteColor()
        window.makeKeyAndVisible()
        self.window = window

        let bundle = NSBundle(forClass: ImageSearchTableViewController.self)
        let storyboard = SwinjectStoryboard.create(
            name: "Main",
            bundle: bundle,
            container: container)
        window.rootViewController = storyboard.instantiateInitialViewController()

        return true
    }
    // Omitted...
}
To ensure all the types are registered to container, we should add unit tests. Before adding the tests, delete SwinjectMVVMExampleTests.swift, which is unnecessary, in SwinjectMVVMExampleTests group. Then add AppDelegateSpec.swift with the following content to the group. The tests use .notTo(beNil()) to check the types can be resolved by container.
AppDelegateSpec.swift
import Quick
import Nimble
import Swinject
import ExampleModel
import ExampleViewModel
import ExampleView
@testable import SwinjectMVVMExample

class AppDelegateSpec: QuickSpec {
    override func spec() {
        var container: Container!
        beforeEach {
            container = AppDelegate().container
        }

        describe("Container") {
            it("resolves every service type.") {
                // Models
                expect(container.resolve(Networking.self)).notTo(beNil())
                expect(container.resolve(ImageSearching.self)).notTo(beNil())

                // ViewModels
                expect(container.resolve(ImageSearchTableViewModeling.self))
                    .notTo(beNil())
            }
            it("injects view models to views.") {
                let bundle = NSBundle(forClass: ImageSearchTableViewController.self)
                let storyboard = SwinjectStoryboard.create(
                    name: "Main",
                    bundle: bundle,
                    container: container)
                let imageSearchTableViewController = storyboard
                    .instantiateViewControllerWithIdentifier("ImageSearchTableViewController")
                    as! ImageSearchTableViewController

                expect(imageSearchTableViewController.viewModel).notTo(beNil())
            }
        }
    }
}
Input Command-U and run the unit tests. Passed, right? We got the empty implementation of View and ViewModel with the dependencies injected.
Actual Implementation of View and ViewModel
In this section, we are going to add actual implementation of View and ViewModel to display image meta data (tags and pixel sizes) in the table view. Although we will add a UIImageView to the table view cell, only the labels for the meta data are implemented in this blog post. The image view will be used in the next blog post.
ViewModel Implementation
First, let’s implement the table data source. In MVVM architecture, the data source is implemented in ViewModel. Add cellModels property and startSearch method to ImageSearchTableViewModeling protocol.
ImageSearchTableViewModeling.swift
import ReactiveCocoa

public protocol ImageSearchTableViewModeling {
    var cellModels: AnyProperty<[ImageSearchTableViewCellModeling]> { get }
    func startSearch()
}
cellModels property is defined as AnyProperty type to make it observable. The type provides producer property as SignalProducer type to add observers.
Modify ImageSearchTableViewModel to implement the property and method.
ImageSearchTableViewModel.swift
    import ReactiveCocoa
    import ExampleModel

    public final class ImageSearchTableViewModel: ImageSearchTableViewModeling {
        public var cellModels: AnyProperty<[ImageSearchTableViewCellModeling]> {
            return AnyProperty(_cellModels)
        }
        private let _cellModels = MutableProperty<[ImageSearchTableViewCellModeling]>([])
        private let imageSearch: ImageSearching

        public init(imageSearch: ImageSearching) {
            self.imageSearch = imageSearch
        }

        public func startSearch() {
            imageSearch.searchImages()
                .map { response in
                    response.images.map {
                        ImageSearchTableViewCellModel(image: $0)
                            as ImageSearchTableViewCellModeling
                    }
                }
                .observeOn(UIScheduler())
                .on(next: { cellModels in
                    self._cellModels.value = cellModels
                })
                .start()
        }
    }
cellModels property wraps _cellModels property as MutableProperty type. Because the type is not only observable but also modifiable, _cellModels is private and is wrapped by AnyProperty type to provide a read-only property.
startSearch method starts the SignalProducer returned by imageSearch.searchImages. As a side effect on the next event, it sets the value of _cellModels to an array of ImageSearchTableViewCellModeling instances that is mapped from response from imageSearch. Notice that the side effect is configured to run in the main thread by .observeOn(UIScheduler()). ViewModel should ensure that events from ViewModel to View are performed in the main thread.
ReactiveCocoa provides two types of schedulers to run on the main thread. One is QueueScheduler.mainQueueScheduler, which delivers events always on the main thread asynchronously. The other is UIScheduler, as we used, which delivers events on the main thread synchronously if they are already on the main thread, otherwise asynchronously.
Next, add id, pageImageSizeText and tagText properties to ImageSearchTableViewCellModeling protocol. id is added just for debugging purpose.
ImageSearchTableViewCellModeling.swift
public protocol ImageSearchTableViewCellModeling {
    var id: UInt64 { get }
    var pageImageSizeText: String { get }
    var tagText: String { get }
}
Then modify ImageSearchTableViewCellModel to implement the protocol. The properties are set when it is initialized by ImageSearchTableViewModel. What ImageSearchTableViewCellModel implements are view logics defining how Model data are displayed in View.
ImageSearchTableViewCellModel.swift
import ExampleModel

public final class ImageSearchTableViewCellModel: ImageSearchTableViewCellModeling {
    public let id: UInt64
    public let pageImageSizeText: String
    public let tagText: String

    internal init(image: ImageEntity) {
        id = image.id
        pageImageSizeText = "\(image.pageImageWidth) x \(image.pageImageHeight)"
        tagText = image.tags.joinWithSeparator(", ")
    }
}
Unit Tests for ViewModel Implementation
Let’s add unit tests to check our ViewModel implementation. First, delete ExampleViewModelTests.swift, which is unnecessary, in ExampleViewModelTests group. Then add DummyResponse.swift and ImageSearchTableViewModelSpec.swift with the following contents to the group.
DummyResponse.swift
@testable import ExampleModel
@testable import ExampleViewModel

let dummyResponse: ResponseEntity = {
    let image0 = ImageEntity(
        id: 10000,
        pageURL: "https://somewhere.com/page0/",
        pageImageWidth: 1000,
        pageImageHeight: 2000,
        previewURL: "https://somewhere.com/preview0.jpg",
        previewWidth: 250,
        previewHeight: 500,
        imageURL: "https://somewhere.com/image0.jpg",
        imageWidth: 100,
        imageHeight: 200,
        viewCount: 99,
        downloadCount: 98,
        likeCount: 97,
        tags: ["a", "b"],
        username: "User0")
    let image1 = ImageEntity(
        id: 10001,
        pageURL: "https://somewhere.com/page1/",
        pageImageWidth: 1500,
        pageImageHeight: 3000,
        previewURL: "https://somewhere.com/preview1.jpg",
        previewWidth: 350,
        previewHeight: 700,
        imageURL: "https://somewhere.com/image1.jpg",
        imageWidth: 150,
        imageHeight: 300,
        viewCount: 123456789,
        downloadCount: 12345678,
        likeCount: 1234567,
        tags: ["x", "y"],
        username: "User1")
    return ResponseEntity(totalCount: 123, images: [image0, image1])
}()
ImageSearchTableViewModelSpec.swift
import Quick
import Nimble
import ReactiveCocoa
@testable import ExampleModel
@testable import ExampleViewModel

class ImageSearchTableViewModelSpec: QuickSpec {
    // MARK: Stub
    class StubImageSearch: ImageSearching {
        func searchImages() -> SignalProducer<ResponseEntity, NetworkError> {
            return SignalProducer { observer, disposable in
                observer.sendNext(dummyResponse)
                observer.sendCompleted()
            }
            .observeOn(QueueScheduler())
        }
    }

    // MARK: Spec
    override func spec() {
        var viewModel: ImageSearchTableViewModel!
        beforeEach {
            viewModel = ImageSearchTableViewModel(imageSearch: StubImageSearch())
        }

        it("eventually sets cellModels property after the search.") {
            var cellModels: [ImageSearchTableViewCellModeling]? = nil
            viewModel.cellModels.producer
                .on(next: { cellModels = $0 })
                .start()
            viewModel.startSearch()

            expect(cellModels).toEventuallyNot(beNil())
            expect(cellModels?.count).toEventually(equal(2))
            expect(cellModels?[0].id).toEventually(equal(10000))
            expect(cellModels?[1].id).toEventually(equal(10001))
        }
        it("sets cellModels property on the main thread.") {
            var onMainThread = false
            viewModel.cellModels.producer
                .on(next: { _ in onMainThread = NSThread.isMainThread() })
                .start()
            viewModel.startSearch()

            expect(onMainThread).toEventually(beTrue())
        }
    }
}
The stub sends dummyResponse wrapped in an event. The first test checks cellModels property is asynchronously set to an array that is converted from dummyResponse. The second test ensures that the event is delivered on the main thread.
Next, add ImageSearchTableViewCellSpec.swift to ExampleViewModelTests group. It simply checks the value assignment to id property and conversions to pageImageSizeText and tagText properties.
ImageSearchTableViewCellModelSpec.swift
import Quick
import Nimble
@testable import ExampleModel
@testable import ExampleViewModel

class ImageSearchTableViewCellModelSpec: QuickSpec {
    override func spec() {
        it("sets id.") {
            let viewModel = ImageSearchTableViewCellModel(image: dummyResponse.images[0])

            expect(viewModel.id).toEventually(equal(10000))
        }
        it("formats tag and page image size texts.") {
            let viewModel = ImageSearchTableViewCellModel(image: dummyResponse.images[0])

            expect(viewModel.pageImageSizeText).toEventually(equal("1000 x 2000"))
            expect(viewModel.tagText).toEventually(equal("a, b"))
        }
    }
}
Type Command-U and run the unit tests. Passed! Let’s move on to the next section.
View Implementation
In this section, we are going to implement our View. Open Main.storyboard and add a UIImageView and two UILabels to the prototype cell. Layout and style them as you prefer. If you want to change the cell height, set rowHeight property of the UITableView (not UITableViewController) in the storyboard on Size Inspector pane.
Then add outlets to ImageSearchTableViewCell and connect them with the items in the storyboard.
ImageSearchTableViewCell.swift
import UIKit
import ExampleViewModel

internal final class ImageSearchTableViewCell: UITableViewCell {
    internal var viewModel: ImageSearchTableViewCellModeling? {
        didSet {
            tagLabel.text = viewModel?.tagText
            imageSizeLabel.text = viewModel?.pageImageSizeText
        }
    }

    @IBOutlet weak var previewImageView: UIImageView!
    @IBOutlet weak var tagLabel: UILabel!
    @IBOutlet weak var imageSizeLabel: UILabel!
}
Notice didSet observer is added to viewModel property to set label texts when the view model is assigned. An image will be added to the image view in the next blog post.
Add implementation to ImageSearchTableViewController as below.
ImageSearchTableViewController.swift
import UIKit
import ExampleViewModel

public final class ImageSearchTableViewController: UITableViewController {
    private var autoSearchStarted = false

    public var viewModel: ImageSearchTableViewModeling? {
        didSet {
            if let viewModel = viewModel {
                viewModel.cellModels.producer
                    .on(next: { _ in self.tableView.reloadData() })
                    .start()
            }
        }
    }

    public override func viewWillAppear(animated: Bool) {
        super.viewWillAppear(animated)

        if !autoSearchStarted {
            autoSearchStarted = true
            viewModel?.startSearch()
        }
    }
}

// MARK: UITableViewDataSource
extension ImageSearchTableViewController {
    public override func tableView(
        tableView: UITableView,
        numberOfRowsInSection section: Int) -> Int
    {
        if let viewModel = viewModel {
            return viewModel.cellModels.value.count
        }
        return 0
    }

    public override func tableView(
        tableView: UITableView,
        cellForRowAtIndexPath indexPath: NSIndexPath) -> UITableViewCell
    {
        let cell = tableView.dequeueReusableCellWithIdentifier(
            "ImageSearchTableViewCell",
            forIndexPath: indexPath) as! ImageSearchTableViewCell
        if let viewModel = viewModel {
            cell.viewModel = viewModel.cellModels.value[indexPath.row]
        }
        else {
            cell.viewModel = nil
        }

        return cell
    }
}
First, didSet observer is added to viewModel property to add an observer to viewModel.cellModels property. When viewModel.cellModels is updated, the table view is reloaded.
Second, viewWillAppear is overridden to run startSearch when the view is displayed only at the first time. autoSearchStarted flag is used without locking because viewWillAppear is called only in the main thread.
Third, UITableViewDataSource protocol methods are implemented simply using our view model.
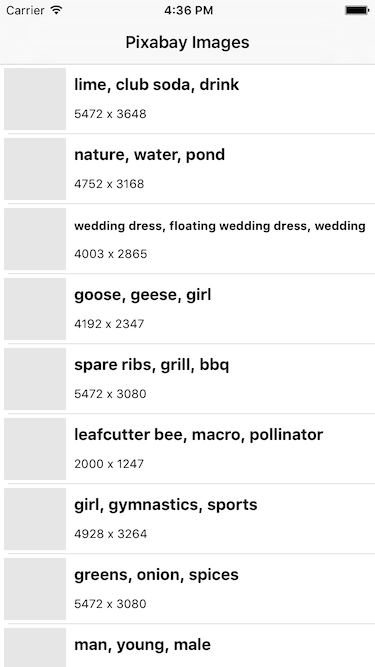
We are ready to run the app. Type Command-R and check the app appears like the following image. The image view is still not implemented, but the labels are filled with the image meta data.
Unit Tests for View Implementation
To make sure startSearch on the view model is called only once when the view appears, add the following unit test to ExampleViewTests group. It uses a mock to count how many times the method is called.
ImageSearchTableViewControllerSpec.swift
import Quick
import Nimble
import ReactiveCocoa
import ExampleViewModel
@testable import ExampleView

class ImageSearchTableViewControllerSpec: QuickSpec {
    // MARK: Mock
    class MockViewModel: ImageSearchTableViewModeling {
        let cellModels = AnyProperty(
            MutableProperty<[ImageSearchTableViewCellModeling]>([]))
        var startSearchCallCount = 0

        func startSearch() {
            startSearchCallCount++
        }
    }

    // MARK: Spec
    override func spec() {
        it("starts searching images when the view is about to appear at the first time.") {
            let viewModel = MockViewModel()
            let storyboard = UIStoryboard(
                name: "Main",
                bundle: NSBundle(forClass: ImageSearchTableViewController.self))
            let viewController = storyboard.instantiateViewControllerWithIdentifier(
                "ImageSearchTableViewController")
                as! ImageSearchTableViewController
            viewController.viewModel = viewModel

            expect(viewModel.startSearchCallCount) == 0
            viewController.viewWillAppear(true)
            expect(viewModel.startSearchCallCount) == 1
            viewController.viewWillAppear(true)
            expect(viewModel.startSearchCallCount) == 1
        }
    }
}
Type Command-U and run the test. Passed!
Conclusion
We implemented the View and ViewModel parts of the example app. First, the empty implementation of View and ViewModel was added to the project to get working software as the agile practices promote. Then the actual implementation was added. It was demonstrated that the dependencies of Model, View and ViewModel were injected by the application. By adding container as a property of AppDelegate, the dependency injection was tested. We learned property types of ReactiveCocoa. MutableProperty was used as an observable property with its value modifiable. AnyProperty was used to provide a read-only view to MutableProperty. In the next blog post, we will implement asynchronous image load feature.
If you have questions, suggestions or problems, feel free to leave comments.
- The instantiation of
SwinjectStoryboardis a bit tricky becauseUIStoryboarddoes not have a normal designated initializer to override by its child classes. To workaround this problem,SwinjectStoryboardis instantiated withcreatefunction instead of an initializer. [return]